Spring Core is like the heart of the Spring framework. The most important thing in spring core is IoC (Inversion of Control) or DI (Dependency Injection). These concepts are the keys to unlocking how Spring works and why it's so powerful.
This blog explores how the Spring Framework implements the Inversion of Control (IoC) principle, also known as dependency injection (DI). IoC is a way of specifying what a object needs, like its dependencies, using XML, annotations, or Java code. Then, the Spring container injects these dependencies when it creates the object. This is different from the traditional way, where the object itself controls how its dependencies are created or found hence its called Inversion of Control.
In the Spring framework, we have two containers: BeanFactory and ApplicationContext. The BeanFactory is the fundamental container used for dependency injection. The ApplicationContext is a sub-interface that extends BeanFactory and provides additional features such as easier integration with Spring's AOP (Aspect-Oriented Programming) features, handling message resources for internationalization, publishing events, and supporting application-layer specific contexts like the WebApplicationContext, which is designed for use in web applications.
BeanFactory Example
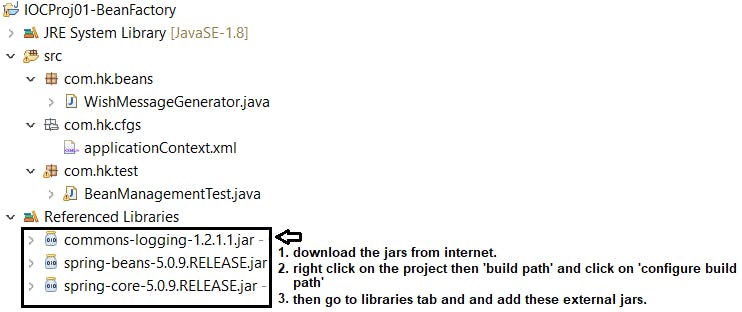
Create a new Java project in Eclipse or IntelliJ, or any IDE you prefer—I'll be using Eclipse STS. Then, organize the project structure by adding JAR files, Java classes, XML files, and packages according to the following folder structure.

I have one bean class(POJO) WishMessageGenerator and it has dependency with the object of java.util.Date class.
WishMessageGenerator.java
//Spring Bean class (POJO class)
package com.hk.beans;

import java.util.Date;

public class WishMessageGenerator {

    private Date date;

    public WishMessageGenerator() {
        System.out.println("WishMessageGenerator.0-param constructor");
    }

    public String sayHello(String user) {
        return "Hello " + user + ", The time is::" + date.toString();
    }

    public Date getDate() {
        return date;
    }

    public void setDate(Date date) {
        this.date = date;
    }
}
We will specify/mention this dependency in applicationContext.xml file as below.
1. Here we created two beans one with id:'dt' and another with id:'wmg'.
2. the 'wmg' bean is dependent on 'dt', so we will inject it using <property> tag which basically inject the object using setter method.
3. we have used 'ref' tag, that means it will inject another bean having id:'dt'
applicationContext.xml
<?xml version="1.0" encoding="UTF-8"?>
<beans xmlns="http://www.springframework.org/schema/beans"
    xmlns:xsi="http://www.w3.org/2001/XMLSchema-instance"
    xsi:schemaLocation="http://www.springframework.org/schema/beans http://www.springframework.org/schema/beans/spring-beans.xsd">

    <!-- Spring beans cfgs -->
    <bean id="dt" class="java.util.Date">
    </bean>
    <bean id="wmg" class="com.hk.beans.WishMessageGenerator">
        <!-- collaborators and configuration for this bean go here -->
        <property name="date" ref="dt"></property>
    </bean>
    <!-- more bean definitions go here -->
</beans>
Now that we have all the beans, lets write the main class to test the configuration.
To instruct Spring to create objects for our beans, we need to provide a configuration file as a resource. The following line of code locates the configuration file and holds all the bean data:
Resource res = new FileSystemResource("src/com/hk/cfgs/applicationContext.xml");
Next, we create the BeanFactory Container, which will handle the creation of objects for us. The BeanFactory requires the configuration file as a Resource. Here, we initialize a BeanFactory named 'factory' by passing the res resource, which holds the configuration file 'applicationContext.xml'. The 'XmlBeanFactory' class processes the XML configuration file to create and manage the beans defined within it.
The following line of code accomplishes this:
BeanFactory factory = new XmlBeanFactory(res);
Once we have the container set up, we can retrieve our objects. For instance, suppose we need an object of the WishMessageGenerator class, and the bean id is 'wmg'. The following line of code searches for the bean with id 'wmg'. When it finds the bean, it sees that there is a dependency with the 'java.util.Date' class identified by the bean id 'dt'.
Here's how it works: the code creates an object of the WishMessageGenerator class, then creates another object of the Date class, and injects it using a setter method, because in the XML configuration we used <property> tag for this dependency. Finally, it returns the object.
WishMessageGenerator generator = (WishMessageGenerator) factory.getBean("wmg");
Above line retrieves the bean named 'wmg' from the BeanFactory container and casts it to the WishMessageGenerator class. This way, we obtain an instance of the WishMessageGenerator class with all its dependencies resolved and injected.
BeanManagementTest.java
package com.hk.test;

import org.springframework.beans.factory.BeanFactory;
import org.springframework.beans.factory.xml.XmlBeanFactory;
import org.springframework.core.io.FileSystemResource;
import org.springframework.core.io.Resource;

import com.hk.beans.WishMessageGenerator;

public class BeanManagementTest {
    public static void main(String[] args) {
        System.out.println("stat of main(-) method");

        // variables
        WishMessageGenerator generator = null;

        // Locate and hold Spring Bean cfg file
        Resource res = new FileSystemResource("src/com/hk/cfgs/applicationContext.xml");

        // create IOC Container
        BeanFactory factory = new XmlBeanFactory(res);

        // get Bean objs from IOC container
        generator = (WishMessageGenerator) factory.getBean("wmg");
        System.out.println("Wish message::" + generator.sayHello("Hemant"));
        System.out.println("end of main(-) method");
    }
}
Output

ApplicationContext Example
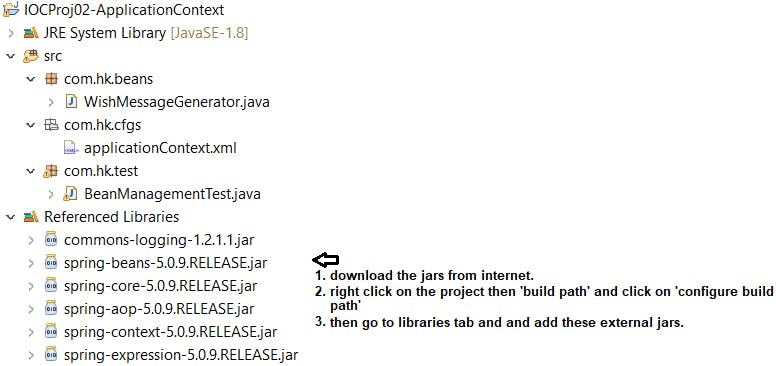
Now, let's replicate the same example using the ApplicationContext container. ApplicationContext, being a sub-interface of BeanFactory, offers additional features. Therefore, we'll require an additional set of JAR files for its functionalities.
Please see below screenshot for folder structures and jars

WishMessageGenerator.java
//Spring Bean class (POJO class)
package com.hk.beans;

import java.util.Date;

public class WishMessageGenerator {

    private Date date;

    public WishMessageGenerator() {
        System.out.println("WishMessageGenerator.0-param constructor");
    }

    public String sayHello(String user) {
        return "Hello " + user + ", The time is::" + date.toString();
    }

    public Date getDate() {
        return date;
    }

    public void setDate(Date date) {
        this.date = date;
    }
}
applicationContext.xml
<?xml version="1.0" encoding="UTF-8"?>
<beans xmlns="http://www.springframework.org/schema/beans"
    xmlns:xsi="http://www.w3.org/2001/XMLSchema-instance"
    xsi:schemaLocation="http://www.springframework.org/schema/beans http://www.springframework.org/schema/beans/spring-beans.xsd">

    <!-- Spring beans cfgs -->
    <bean id="dt" class="java.util.Date">
    </bean>
    <bean id="wmg" class="com.hk.beans.WishMessageGenerator">
        <!-- collaborators and configuration for this bean go here -->
        <property name="date" ref="dt"></property>
    </bean>
    <!-- more bean definitions go here -->
</beans>
BeanManagementTest.java
ClassPathXmlApplicationContext: It is one of the implementation of ApplicationContext and it tells Spring to look for a configuration file in the specified location.
"com/hk/cfgs/applicationContext.xml": This is the file where you define how your Spring application should work. It contains information about the beans and their configurations.
package com.hk.test;

import org.springframework.context.ApplicationContext;
import org.springframework.context.support.ClassPathXmlApplicationContext;

import com.hk.beans.WishMessageGenerator;

public class BeanManagementTest {
    public static void main(String[] args) {
        System.out.println("stat of main(-) method");

        ApplicationContext applicationContext = new ClassPathXmlApplicationContext("com/hk/cfgs/applicationContext.xml");

        WishMessageGenerator wmg = applicationContext.getBean("wmg",WishMessageGenerator.class);
        System.out.println(wmg.sayHello("Hemant"));

        System.out.println("end of main(-) method");
    }
}
Difference between BeanFactory container and ApplicationContext container

| Feature | BeanFactory | ApplicationContext |
| Container Type | Fundamental container for managing beans | Advanced container extending BeanFactory |
| Application Type | Suitable for standalone applications | Suitable for web applications, AOP, ORM, etc. |
| Bean Scopes | Supports Singleton and Prototype scopes | Supports all scopes (Singleton, Prototype, Request, Session, etc.) |
| Annotation Support | Does not support annotations | Supports annotation-based configuration |
| Messaging Functionality (i18n) | Does not provide messaging functionality | Extends MessageSource for messaging support |
| Event Publication | Does not support event publication | Supports event handling via ApplicationEvent |
| BeanPostProcessor Registration | Requires manual registration | Automatically registers at startup |
| Initialization Strategy | Lazy initialization | Eager initialization |
| Memory Consumption | Requires less memory | Requires more memory |
How to use multiple Configuration files?
To use multiple configuration files we use import tag like below.
<import resource="applicationContextChild.xml"/>
Example:
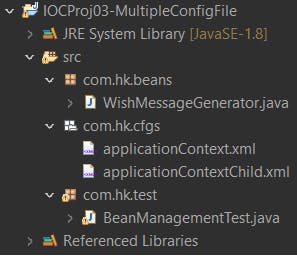
Create a project with below folder structure.

applicationContext.xml
<?xml version="1.0" encoding="UTF-8"?>
<beans xmlns="http://www.springframework.org/schema/beans"
    xmlns:xsi="http://www.w3.org/2001/XMLSchema-instance"
    xsi:schemaLocation="http://www.springframework.org/schema/beans http://www.springframework.org/schema/beans/spring-beans.xsd">

    <!-- Spring beans cfgs -->
    <import resource="applicationContextChild.xml"/>
    <bean id="wmg" class="com.hk.beans.WishMessageGenerator">
        <!-- collaborators and configuration for this bean go here -->
    </bean>
    <!-- more bean definitions go here -->
</beans>
applicationContextChild.xml
<?xml version="1.0" encoding="UTF-8"?>
<beans xmlns="http://www.springframework.org/schema/beans"
    xmlns:xsi="http://www.w3.org/2001/XMLSchema-instance"
    xsi:schemaLocation="http://www.springframework.org/schema/beans http://www.springframework.org/schema/beans/spring-beans.xsd">

    <!-- Spring beans cfgs -->
    <bean id="dt" class="java.util.Date">
    </bean>

    <!-- more bean definitions go here -->
</beans>
WishMessageGenerator.java
//Spring Bean class (POJO class)
package com.hk.beans;

public class WishMessageGenerator {

    public WishMessageGenerator() {
        System.out.println("WishMessageGenerator.0-param constructor");
    }

    public String sayHello(String user) {
        return "Good Morning::"+user;
    }
}
BeanManagementTest.java
package com.hk.test;

import java.util.Date;

import org.springframework.beans.factory.xml.XmlBeanDefinitionReader;
import org.springframework.context.ApplicationContext;
import org.springframework.context.support.ClassPathXmlApplicationContext;
import org.springframework.context.support.GenericApplicationContext;

import com.hk.beans.WishMessageGenerator;

public class BeanManagementTest {

    // spring 5.0.x doc https://docs.spring.io/spring-framework/docs/5.0.x/spring-framework-reference/

    public static void main(String[] args) {
        System.out.println("stat of main(-) method")

        GenericApplicationContext context = new GenericApplicationContext();
        new XmlBeanDefinitionReader(context).loadBeanDefinitions("com/hk/cfgs/applicationContext.xml");
        //new XmlBeanDefinitionReader(context).loadBeanDefinitions("services.xml", "daos.xml");
        context.refresh();
        Date date = context.getBean("dt", Date.class);
        WishMessageGenerator wmg = context.getBean("wmg",WishMessageGenerator.class);


        System.out.println(wmg.sayHello("Hemant"));
        System.out.println("date : " +date);

        System.out.println("end of main(-) method");
    }
}

